Supplies:
- plastic eggs
- cotton, polyester, rayon, silk fabric
- ribbon
- ModPodge, matte or gloss finish
- hot glue gun and glue sticks
- fabric Scissors
- adornments
- felt
- thicker embroidery needles
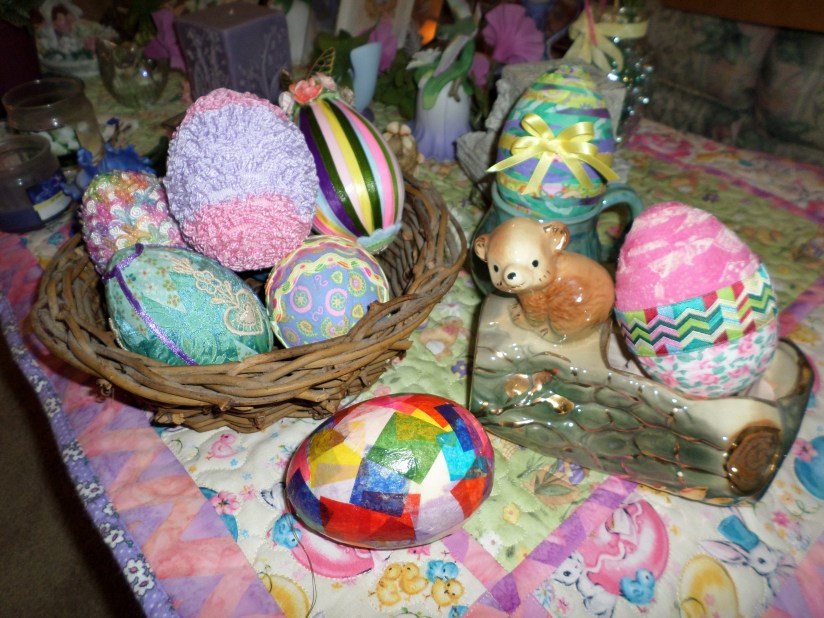
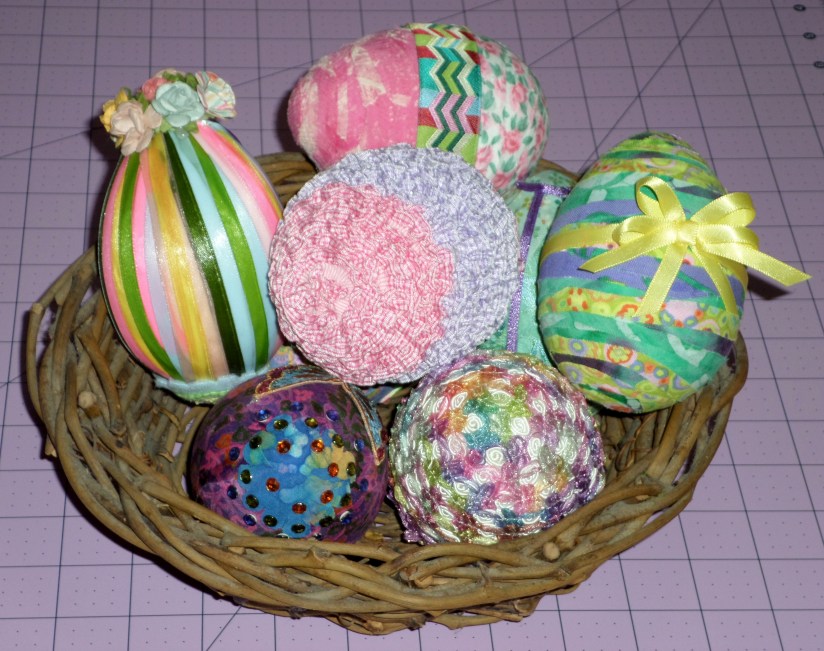
This project is a great way to use up scraps of ribbons and fabric. When selecting fabrics, silk-weight fabrics are great because their fluidity works well with the curved surface of the eggs, but quilting cotton is fine as well. For plastic eggs, I found these large eggs by Creatology at Michael’s and thoroughly enjoyed their eggshell textured surface for good gluing.
I tried a few different ways of decorating the eggs, the first is a basic ribbon wrap. For these large size of eggs, a standard roll of 9 feet of ribbon was enough to cover the egg. My first ribbon had double ruffles, and created a wonderful effect on the egg. I was using up pieces of ribbon, didn’t know if I would have enough, so in this case I started gluing around the midsection of the egg first.
Apply a couple inches of hot glue along the flat center of the ribbon, then press that down onto the surface of the egg. If eyeing straight lines is not a natural talent of yours, you may want to lightly draw a guideline around the center of the egg to help you start. After you complete the first rotation, slightly veer the ribbon to one side of your starting point, and continue to glue and wrap towards the tip of the egg. With this ruffled ribbon, I had to hold back the ruffle of the previous row as I adhered fresh sections so the ruffles did not get stuck under the ribbon, and also to keep the rows laying closely together, to maximize the loft of the ruffles. When you get to the tip of the egg, place plenty of glue on the surface of the egg, and keep circling the ribbon until there is no more surface space to cover. If your ribbon is prone to raveling at the end, just compress the width of the ribbon, tuck it under itself by a small amount, and securely glue that down. Now return to the center of the egg, and wrap ribbon to the other end of the egg.


This turned out to be my favorite of the eggs, because there is a slight squoosh when you hold the egg, it’s such a textural delight.
The other ribbon I used had small flourishes above and below the central line of the ribbon. When you apply the ribbon, keep in mind that these parts will overlap onto the previous row, and you will have to decide which end of the egg to start gluing from in order to create the overlap look that you like. I was so tickled to have swirls in both the ribbon design as well as the wrapping of the ribbon around the egg! Notice how I started wrapping at the top of the egg, so the overlap parts point towards the top of the egg. This reminded me of a pinecone, and of the pineal gland.

The next ribbon style I tried was way more complicated, but I used up several bits of ribbon, and it ended up having a lovely Springtime in Paris look to it.
Collect your ribbons, cutting lengths that are about 1-1/2 times the length of the egg from tip to tip. Lay them side by side and make sure that width is enough to cover the circumference of the egg, plus a little more because the ribbons will be overlapping slightly.
Next I cut two small circles of 100% wool felt. You want to use a felt that is dense enough to hold all the knotted ribbon you are about to pull through it. If you only have the thinner synthetic felt, do a double layer of the circle. Now, knot one end of the ribbon and pull it through the felt. Leave about 1/8 inch around the edge of the felt free of ribbon, as well as the center area of the felt.

 Once your ribbon is all sewn through, lay the felt circle knotted-side down, and splay all the ribbons. If your ribbons have a shiny side and a dull side, be sure the dull side faces up. You may have to rotate the knot to make this so. Be sure the ribbons are as UNcrossed as possible, as it will make gluing them much easier. When all the ribbons are prepared, slather the top of the egg with hot glue and attach it to the center of the felt circle. And yes, an octopus comes to mind!


So, if you still have any patience and perseverance left from sorting those ribbons, get ready. It’s time to start gluing. Taking one ribbon at a time, brush some Modpodge onto its underside, and carefully align it down to the bottom of the egg. Take the next ribbon, apply the Podge, and lay it towards the egg bottom so that it just barely overlaps the first ribbon, right at the center, widest part of the egg. The ribbons will overlap more notably near the top and bottom of the egg, so use how it just barely overlaps in the center as your guide for laying down the ribbon. Ribbon by ribbon, keep working your way around the egg. I chose Modpodge rather than hot glue for applying the ribbons because I didn’t want the thickness of the hot glue to ruin the smoothness of the ribbon. And, if you merely hot glued the bottom end of the ribbon, it would bulk up the bottom end of the egg as well as leave your carefully layered ribbons susceptible to disarray. And, because Modpodge requires time to dry, I only glued about one fourth of the circumference at a time. Trim off the ends of the ribbon so they centrally align at the bottom. When you’re done gluing each ribbon, give it time to dry, then paint on a layer of glossy Modpodge around the whole egg (actually, don’t paint the top felt circle.)


You’re almost done! Take the second felt circle and hot glue it to the bottom, to cover the ribbon ends. I added some decorative embroidery to mine. To cover the knots on the top, I had these little paper flowers on-hand to hot glue onto there. But little ribbon flowers would be good as well. You can buy those pre-made or make them yourself.


And, ooo-la-la, you’re done!

Ok, we’re halfway there. It’s time for some fabric-wrapping. The thing that got me started on all this was imagining how well a spiral of fabric could overlay onto an egg. So I created my template, that of a double-wound spiral. I traced a circle, then eyeballed drawing a spiral that was about an inch thick, until I neared the center of the circle. I went back and drew a second line that halved the spiral (so, 1/2 inch thick) and instead of converging the ends to the two lines at the center of the circle, I terminated them in a curl. When the fabric is cut, you have two spirals of fabric. The size of your staring circle depends on the size of the egg you’re using, an oatmeal canister lid served me well here; a soup can would be a good size for smaller eggs.


As you adhere the spiral with Modpodge, just do an inch or two at a time. Start with the center, wind outward. You want to avoid puckers in the fabric as you wind it, and sometimes your winding will overlap the previous row of fabric, in order to keep it flat. You will cover about half of the egg with each spiral.


Next, I applied thin curved strips of other fabrics to fill in the gaps and add color and texture.


I kept adding strips until the whole egg was covered. I made one egg with evenly distributed color variance, and one that was half and half (with my filler strips being the same fabric as my spiral.) I added ribbon adornments to finish the eggs.


For the fully fabric-wrapped eggs, I cut a rectangle of fabric, wide enough to cover the circumference of the egg, and tall enough to cover from the center of the top point to the center of the bottom. Then I cut triangular wedges from the top and bottom; for the narrower top point I cut taller triangles, for the less-rounded bottom of the egg, I cut stouter triangles.
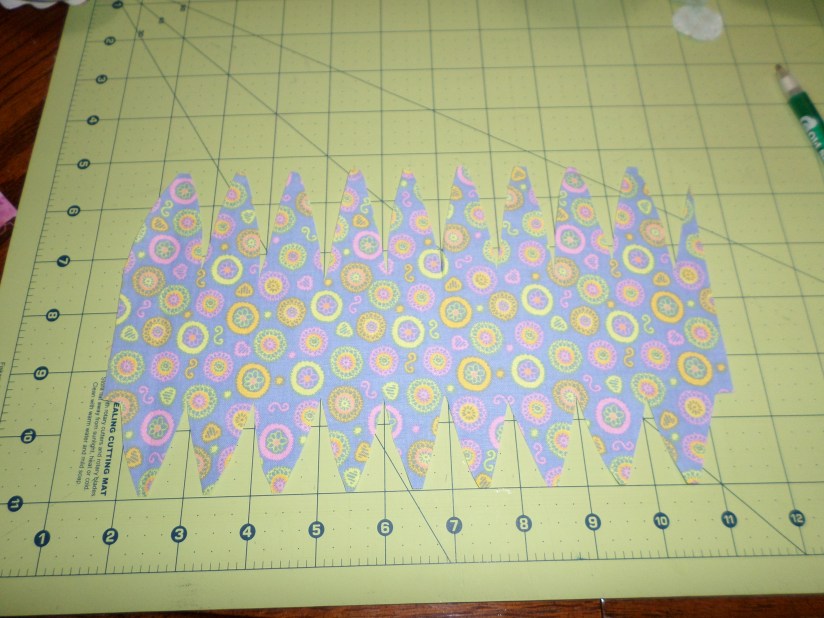 Modpodge one longitudinal section at a time, carefully overlapping fabric as it curves towards the tips of the egg, and being sure to keep puckers out of the egg. The advantage of ModPodge is that if you do get a section of fabric that insists on puckering, saturate that area with the glue and smash it as flat as much as possible. This usually gets the puckers out. Work your way around the egg until it is fully covered.


Finish decorating the egg with more fabric pieces, ribbons, embroidered decals or even adhesive crystals.


And now we’re done!