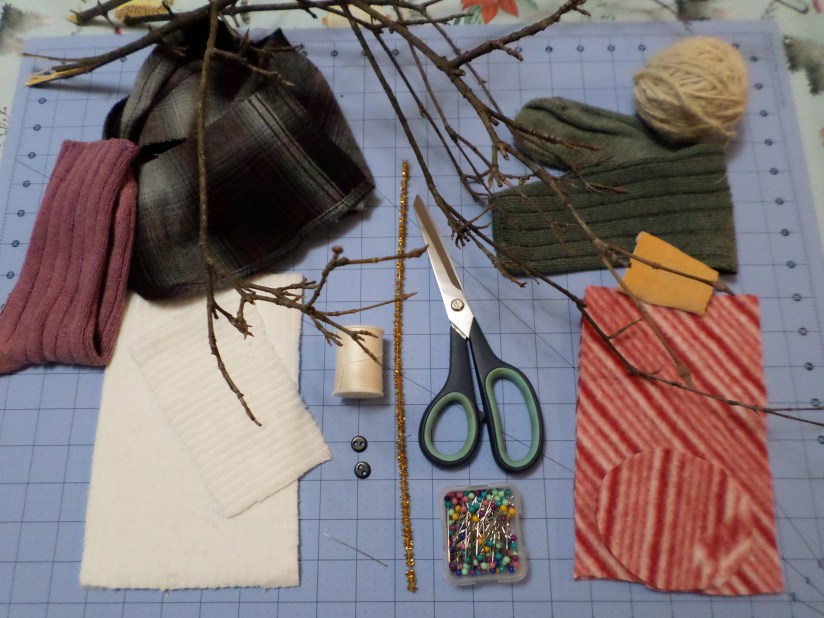
Easter Egg Tulips

Supplies: 

  • Craft egg, my favorite found at Michaels, but styrofoam is good too
  • various felts, two greens for leaves, a rectangle of base felt long enough to wrap around your egg, and smaller scraps for felt appliqués and sculptural bits.
  • small quilter’s cotton fabric scraps that compliment/contrast with your felt color scheme
  • Mod Podge, matte or gloss, to your liking
  • embroidery floss
  • sequins (the bling of the project)
  • small decorative flower pot (tealight sized – thrift stores are a good place to find these)
  • dense styrofoam (not the soft kind for floral arrangements)
  • decorative moss
  • 1/8th inch diameter wooden dowel, about 36 inches long and to be cut in sections
  • green acrylic paint that matches your green felt
  • hot glue gun and glue
  • paint brush for decoupage
  • scissors that are good for cutting felt
  • an awl

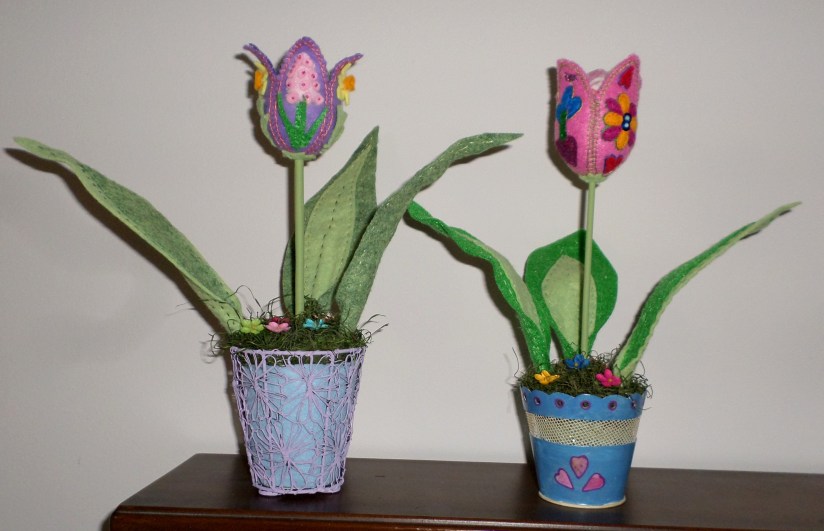
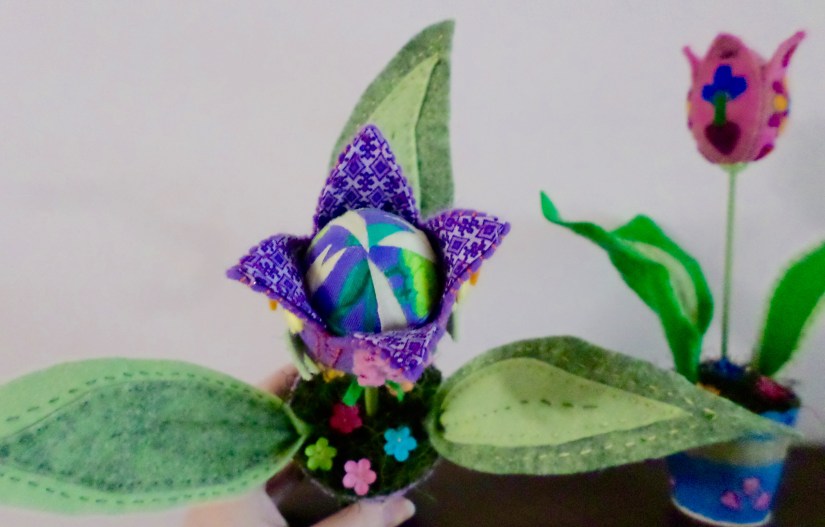
It’s the best of both worlds.  Melding a flower that heralds Spring, that has caused the rise and fall of economic empires, that knows how to keep mum, despite it’s two lips…………….(insert quiet, critical cough here)…………..um, with the Master of Form and primordial creation, the egg.  It’s folk infused.  It’s felt infused.  There’s even a touch of bling.  Over the years, I’ve considered a great many individuals to be not the brightest bulb in the tulip patch, but this project here is really gonna shine.  Okay, let’s grow……

SAMSUNG CAMERA PICTURES

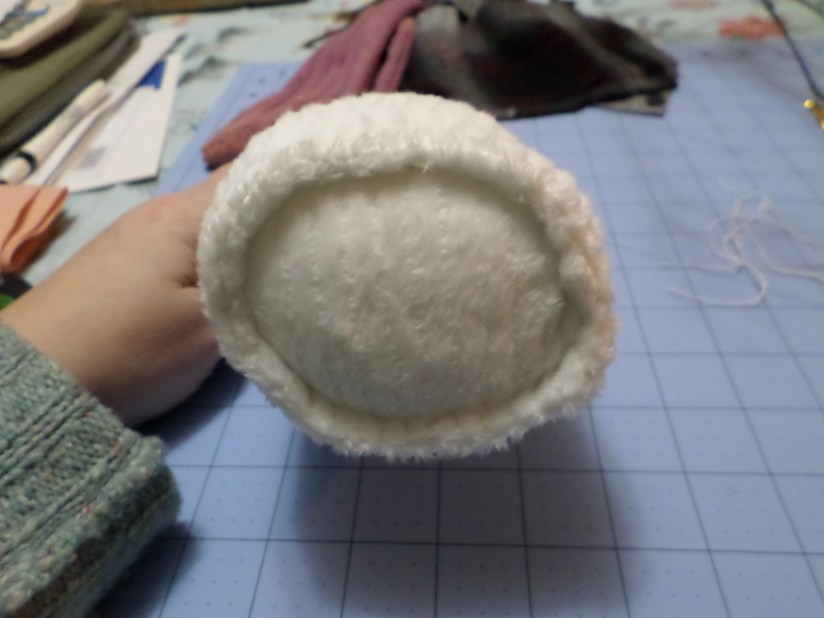
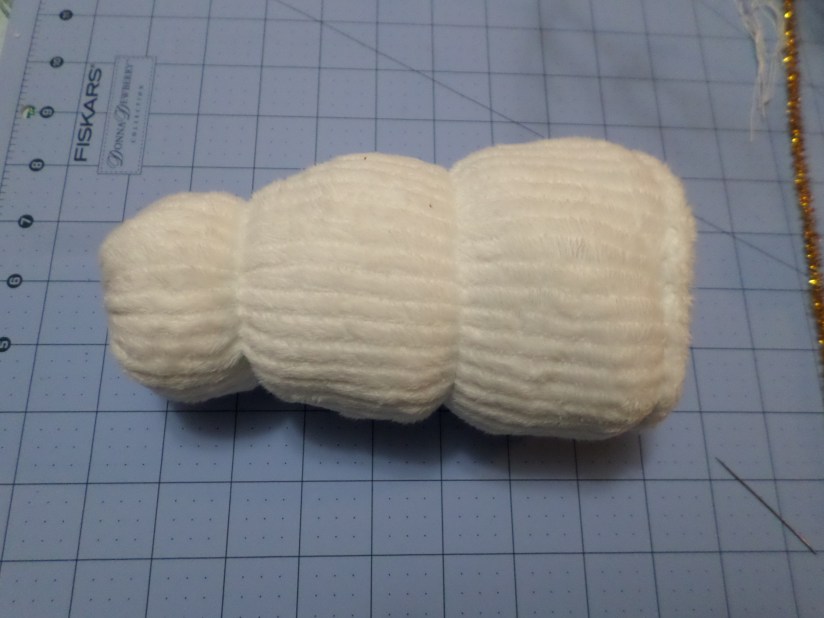
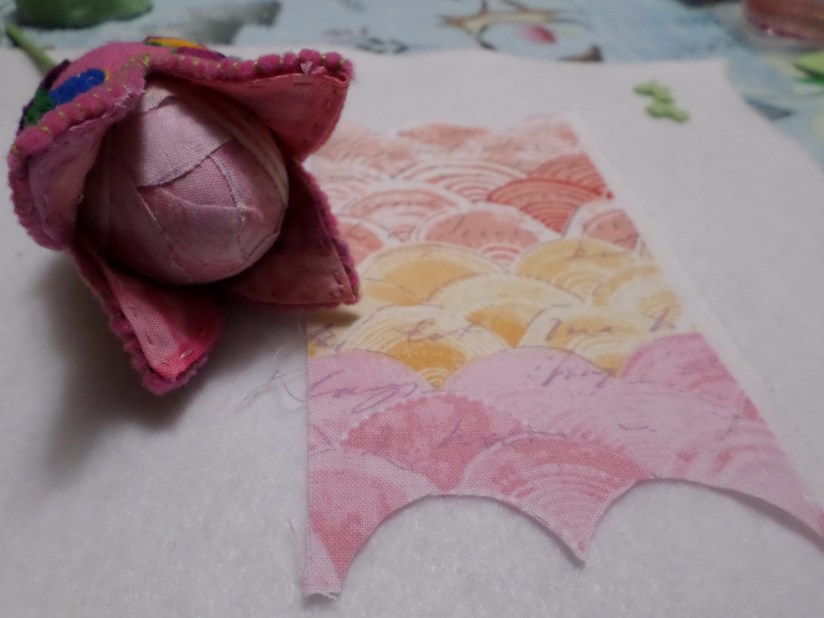
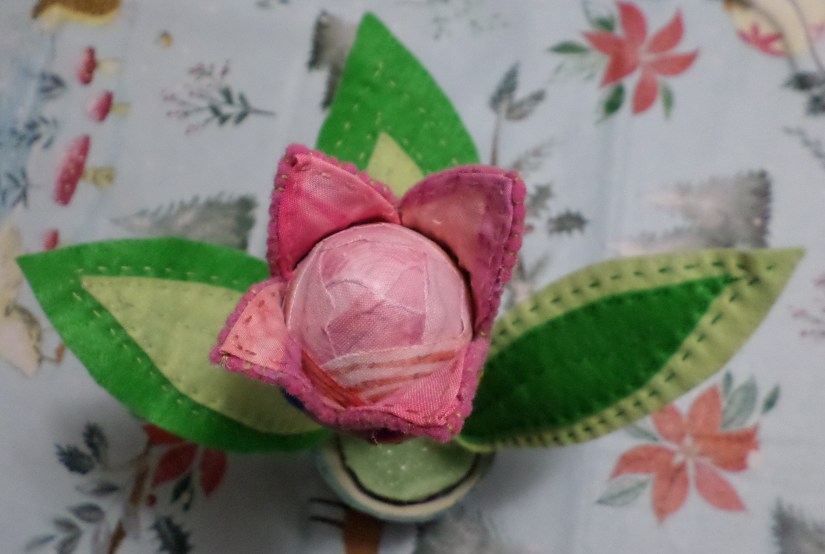
I’m using the small, normal egg-sized eggs for this project, but you can use larger eggs.  Those will simply require larger pieces of felt and much more time spent embroidering.  If you do not like working tiny, then the larger eggs may be your better choice.  I took small scraps of fabric and Mod Podged them onto the egg, covering from the narrow tip of the egg, to the halfway point.  Give it a few minutes to dry. My original photos of this step were poor, so here is the aftermath.  I cut the scallop shapes from my fabric, and you can see how they were applied around the end of the egg.  I made three different eggs, two of them became tulips.  My photos are showing steps from among the three eggs.

SAMSUNG CAMERA PICTURES

Using the awl, gently poke a hole that is the same diameter as the dowel, through the bottom of the egg.  Being careful avoids unintentionally cracking the egg (as I did.)  Put a glob of hot glue on the end of a 12 inch piece of dowel, then insert the dowel so the glued end adheres to the narrow inner top end of the egg.  Paint the dowel in the green that matches your leaf felt.  Now set this aside.

SAMSUNG CAMERA PICTURES

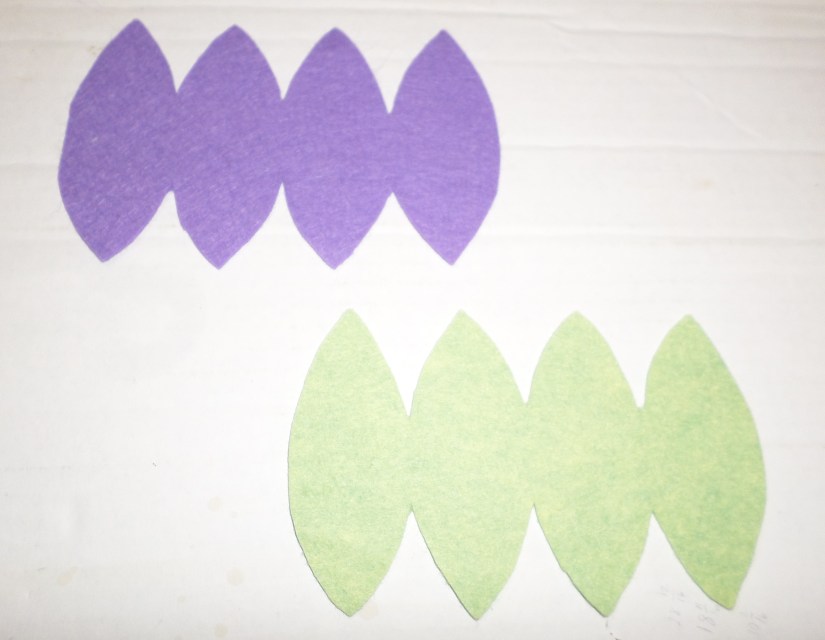
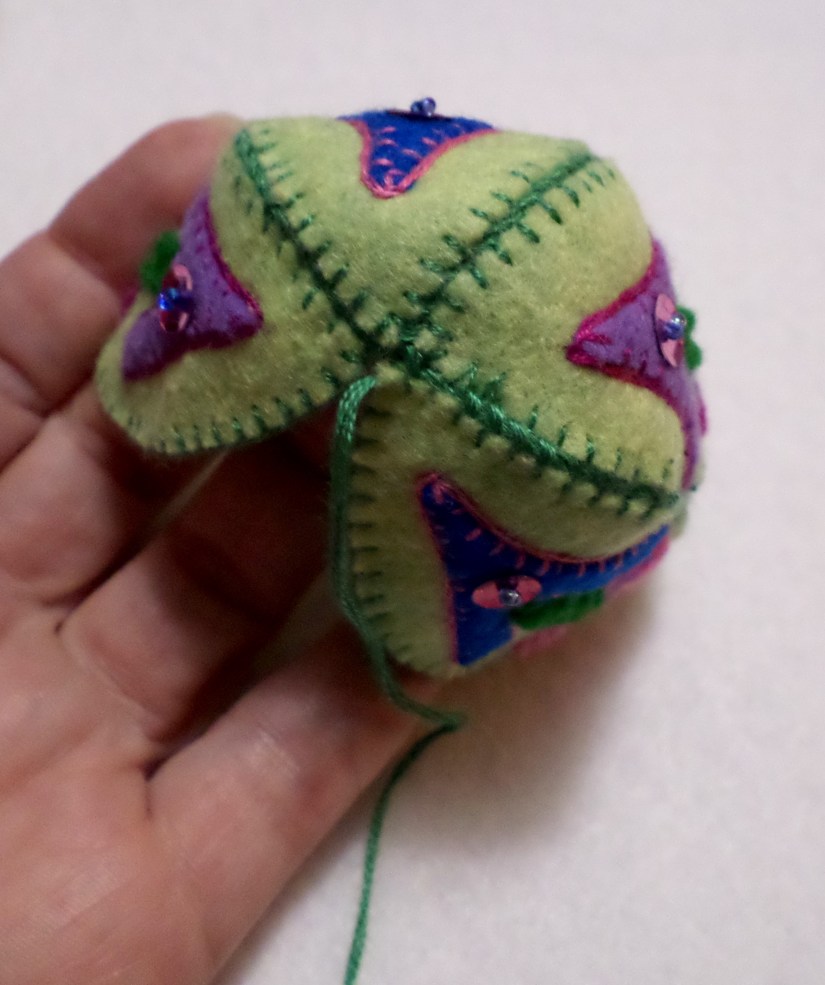
I made my own wrapped-egg template by wrapping and taping a rectangle of paper around the egg then pinching the paper (in quartered sections) following the arc towards each end of the egg.  Then I removed the paper, drew a clear line on the creases made by my pinching, then cut it out.  This website has a lovely demonstration of the general shape you are looking for.  NOTE: I realized after my first egg that the felt shrinks as it is embroidered, and the more you embellish it, the more it shrinks.  So if you make your template to the actual size of the egg, be sure to cut your felt with an extra 1/8th inch or so for wrapping around the egg, as well as 1/16th  or so for the arcs towards the tips of the egg.  Once your template is set, cut your base piece of felt.  Since this piece will receive a lot of stitching, try to use a thicker or more durable piece of felt for this.  Wrap the base around the egg to just to make sure it will fit the circumference of the egg. Here are my three designs: the basic layout, a finished layout, and a 3D layout!

SAMSUNG CAMERA PICTURES SAMSUNG CAMERA PICTURES SAMSUNG CAMERA PICTURES

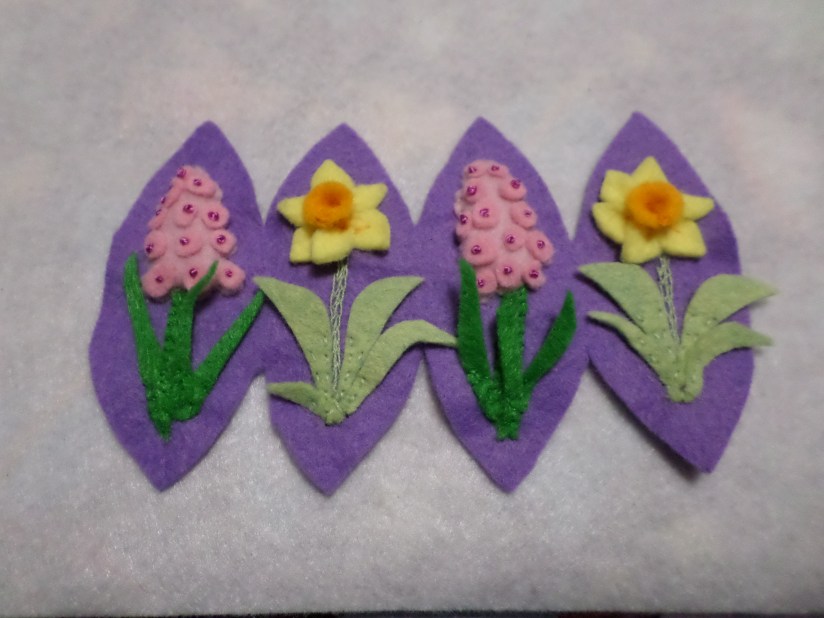
The eggs I saw here inspired my own designs.  I took my felt scraps and cut my design elements.  I decided to make two design sets per egg, so opposite sides of the egg would have the same image.  I recommend doing your decorative embroidery around the edging/four sections of the egg first. (I lived and learned on this point.)  I used blanket stitch for my edgings; I’m not a very practiced embroiderer so this simple stitch worked well for me.  You can look online or go to your local library to find nice embroidery stitch ideas and instructions, as I am not focusing to teaching those details here.  I tried the blanket stitch in one direction (inset from the edge) on the pink egg, and the other direction (lining the edge) on the green egg.

SAMSUNG CAMERA PICTURES


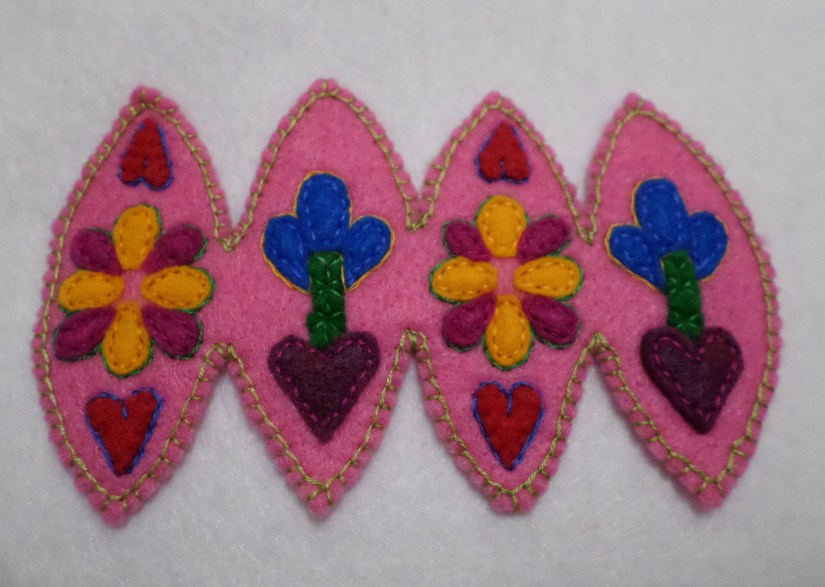
I then laid my appliqué pieces down and bit by bit, stitched them onto the base felt.  NOTE: if there is a top and bottom to your appliqué design, be sure you lay it in the right direction on your felt base.  The base of the egg template has slightly shorter points and rounder curves that the top of it.

SAMSUNG CAMERA PICTURES


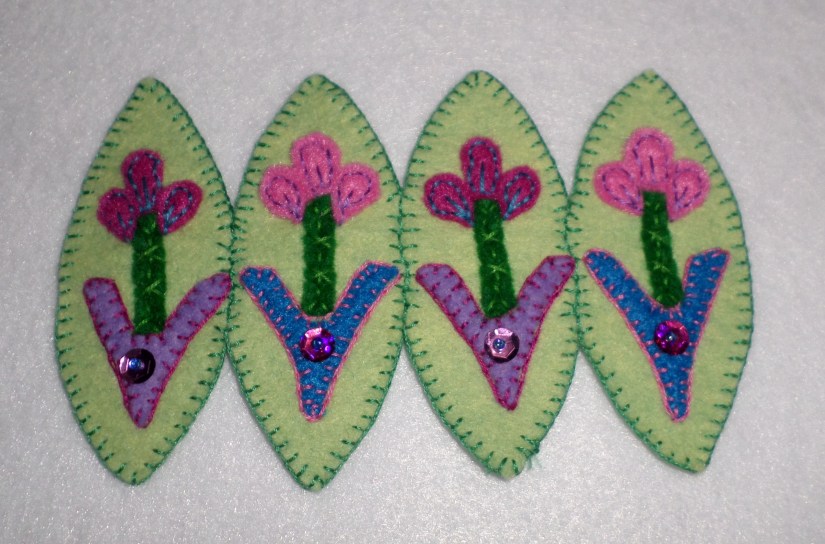
Then came time to attach the sparkly bits.  You can also use beads or buttons to adorn.

SAMSUNG CAMERA PICTURES

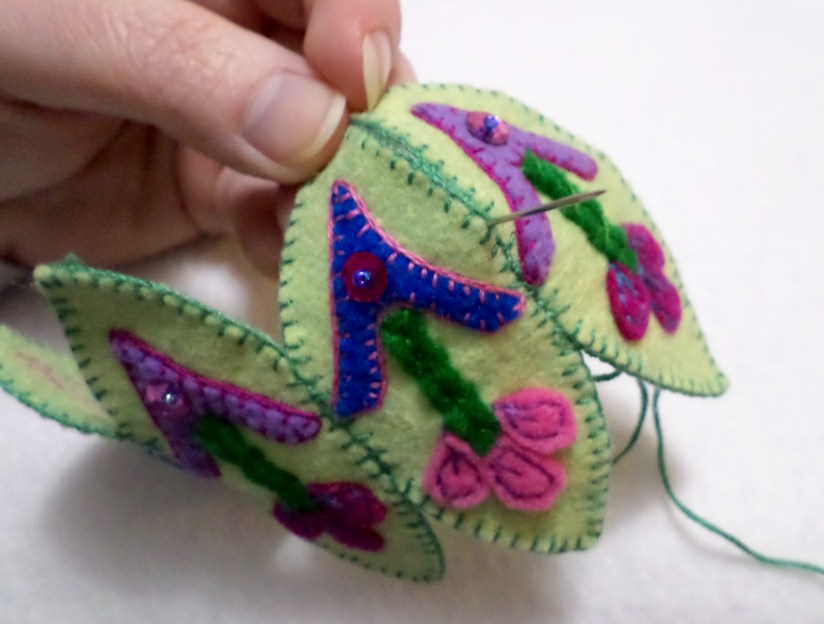
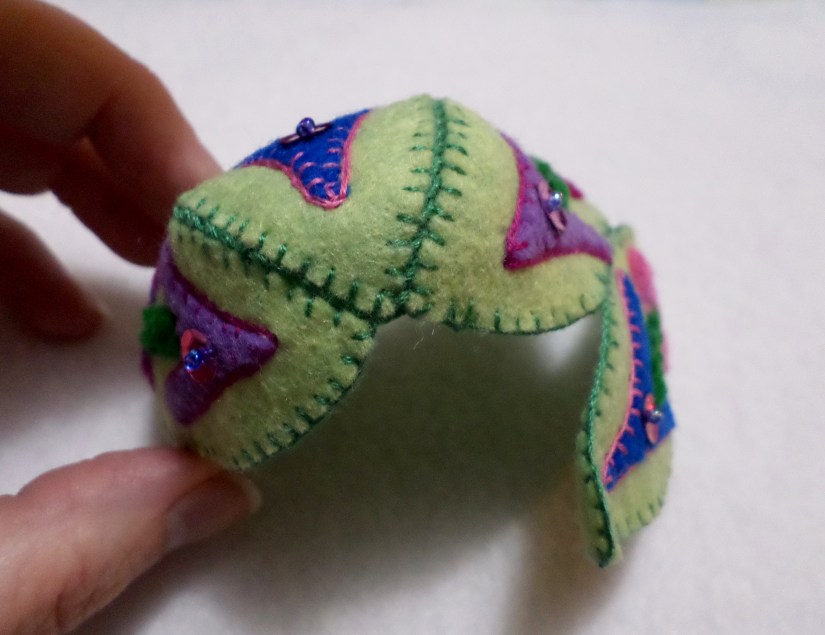
Now it is time to sew together the points and shape the bottom of the egg.  You can see there are three indentations (capital A shaped) for the bottom of the egg.  These are the three you will sew together first.  I started from the middle of the egg, and sewed towards the bottom point, doing one at a time.  I stitched from one side to the other, catching my thread around each prong of my blanket stitched edging.  You can weave the stitching, passing the needle from bottom to top of the felt base, to make a more secure connection between these lobes of the base felt.  When you are done sewing these three seams together the bottom of the egg has a nice cupped shape.

SAMSUNG CAMERA PICTURES

SAMSUNG CAMERA PICTURES

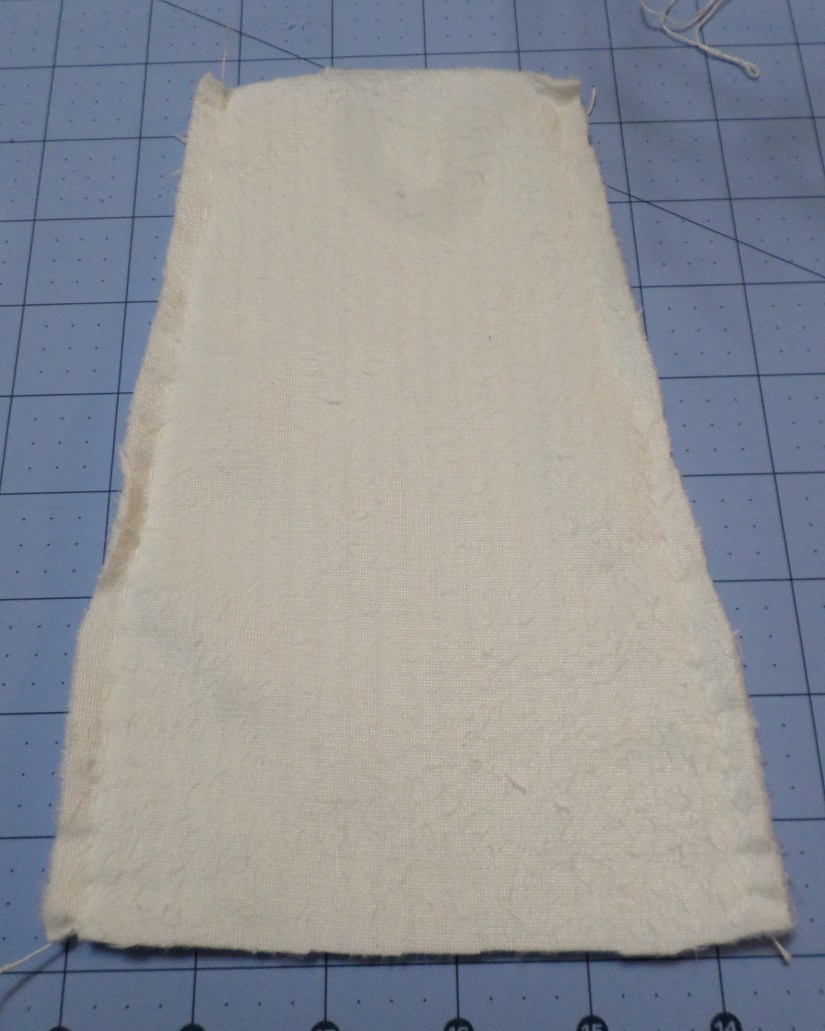
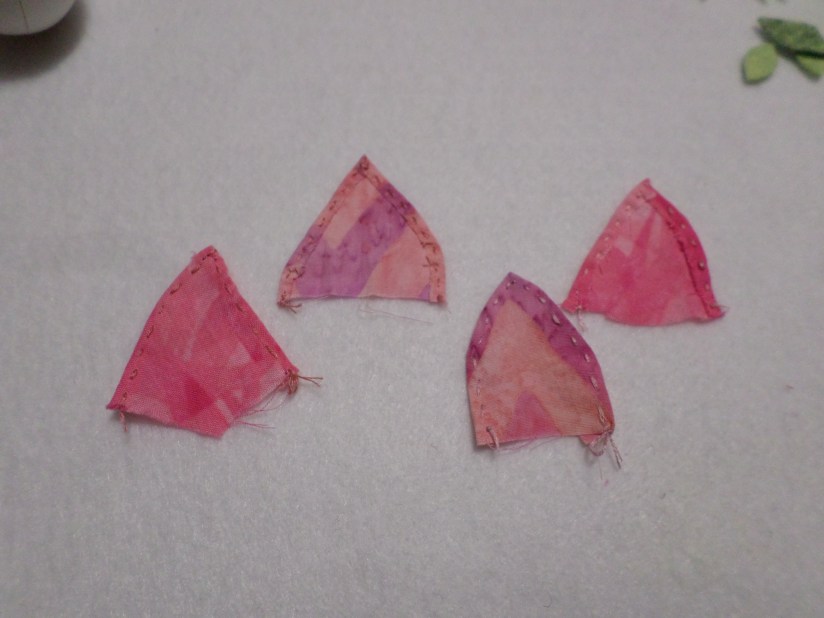
To cover the the backside of the felt base, so you don’t see the stitching, cut four triangles of fabric.  Make them petal-shaped and large enough so you can turn the raw edge under by 1/8th of an inch, and tall enough to cover over half the height of the felt base. Then do a simple (but tidy) baste stitch to secure the edges.  Attach each triangle to the backside points of the top end of the egg, using the hot glue.  Try to glue the very edge of the fabric triangles to near the very edge of the felt base.  The hot glue gives a nice sturdiness to these petals, and helps shape them.

SAMSUNG CAMERA PICTURES

SAMSUNG CAMERA PICTURES

Now, anchor the thread for your last bottom seam (at about the same height you started the others) and then wrap the felt base around your egg.  It should fit fairly securely.  If it is too small by a bit, carefully tug the felt to try and loosen it a little.  If it is too big, try blanketing the bottom of the egg with fabric scraps so the fit is secure.  Sew the final seam of the bottom of the egg.

SAMSUNG CAMERA PICTURES

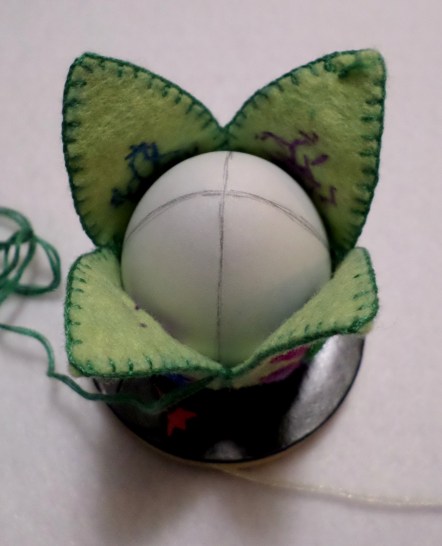
Cut a ring of green felt and hot glue it around the base of the egg.  This helps secure the dowel to the felt egg.

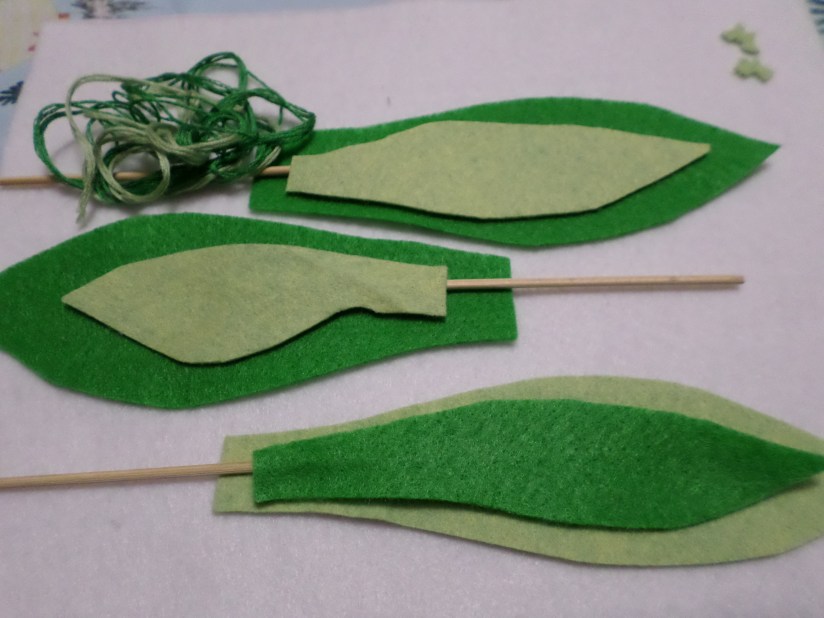
For the leaves, cut three 6-8 inch leaf shapes from your main leaf color of green felt.  Then cut smaller versions from your second color of green felt.  Hot glue an 8 inch piece of dowel between the layers of felt, along the center of the leaf, and to about halfway up the height of the leaf (think, corn dog).  Embroider the two layers of felt together with whatever simple, complex or decorative stitches you like. I then folded the base of the leaves and topstitched them, so they look rolled like tulip leaves do.

SAMSUNG CAMERA PICTURES

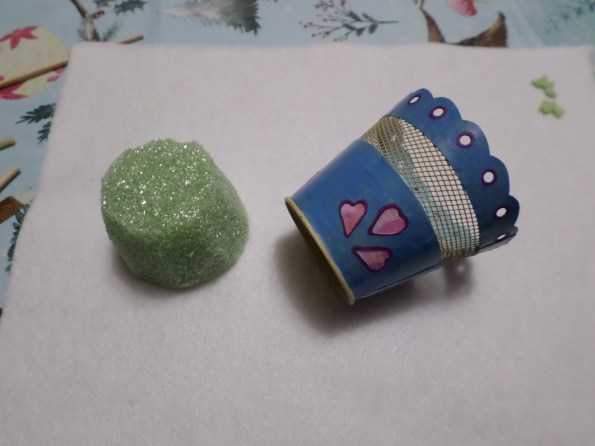
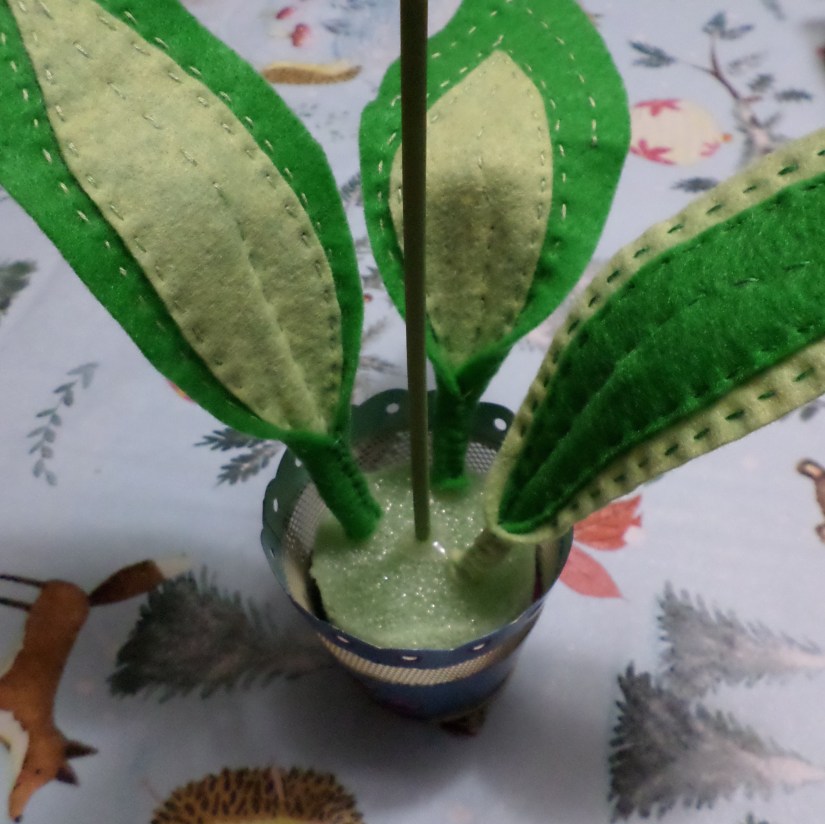
Prepare the flower pot base by hot gluing the styrofoam (I got mine at the dollar store) to inside the pot.  I had to trim my styrofoam to the inner shape of the pot first.  Now  center your tulip flower in the pot.  I added a little hot glue to the pat of the dowel that inserted into the styrofoam, as well as a thick ring of hot glue around the base of the dowel/styrofoam so that the tulip would hold more durably over time.  Do the same in positioning the three leaves.  Lastly, tuck in and maybe glue a bit of moss in the pot, add any decorative bits (I used paper flowers) and your tulip is done!  It is now officially Spring!

SAMSUNG CAMERA PICTURES

SAMSUNG CAMERA PICTURESSAMSUNG CAMERA PICTURES

Happy Easter!

Folk Gnomes/Snowmen

Supplies: (G&S) means Gnome & Snowman

  • 2 pieces of fleece or thicker material, about 8″ X 5″, for use as body (G&S)
  • 1 piece of same fleece or thicker material, oval about 5″ X 3″ at extreme points (G&S)
  • poly fiberfill stuffing for body (G&S)
  • a thicker weight thread (like upholstery thread) that fairly matches body material (G&S)
  • medium-sized sewing needle, with eye big enough for thread
  • scrap fabrics for making hats, scarves, belts (G&S)
  • 1 piece of stretchy ‘nose colored’ fabric, 2″ square (G)
  • yarn or twine for making Gnome beards
  • sundry buttons, flowers, natural ephemera, ribbon for decorative details
  • twigs if you want twig arms for Snowman
  • scissors
  • hot glue gun & glue sticks
  • a sewing machine is handy for making the hats, but not essential.

SAMSUNG CAMERA PICTURES

Cut the two 8″ X 5″ body pieces to slightly taper towards the top (so bottom remains 5″ wide and top has about an inch taken from each side.  Start the tapering angle about 2 inches up from the bottom (so the bottom 2 inches of these pieces remain 5 inches wide.)

sam_1157-1.jpg

With the right sides of the fabric together, baste along the sides with short stitches, 1/4″ from the side edges and back stitch a stitch every few inches along the way.  Top and bottom edges leave unsewn. Give a gentle tug at the corners to be sure the basting does not pucker the edge. Tie-off the thread.

Pin the oval piece to the bottom of the body pieces, right sides of the fabric facing together.  You may need to trim the oval to better fit the circumference of the body (you want the base to be flat when the little guy is stuffed, so do not let the base bulge too much.) Baste the oval base to the sides, back stitch a stitch every inch or so, and give a slight tug before you tie off the thread so there is no puckering.  Turn body inside out.

Sew an extra ring around the base, about 1/4″ inch from the oval base seam, that pinches together the base and the sides.  This creates a more stable base.  Now stuff the body.

SAMSUNG CAMERA PICTURES
second stitching around outer base, then stuffed

For the Snowman, use white thread and tie around the body, dividing it into three sections.  (it may be easier to lay it flat, and tie it like a pork loin.)  With each tier, knot the thread and hide the ends.

SAMSUNG CAMERA PICTURES

For Both, make a few stitches to close the top of the head.  Be sure your fellow is stuffed fairly densely before you close the top.  It doesn’t have to be neat because hats will hide this area.

SAMSUNG CAMERA PICTURES

Hats: two styles. For the Gnomes, I used both old socks as well as made some out of upholstery fabric scraps.  I machine sewed sections of the old socks, and the cut-out fabric hats.

SAMSUNG CAMERA PICTURES
two left: blue yarn shows stitch line/shape for Gnome hat; right: cut-off sweatpant bottom for Snowman hat

For the Snowman, I used the cut-off bottoms from athletic sweatpants.  I machine sewed them to fit the circumference of the snowman head, basted then cinched about an inch from the top, then sewed down the top so the fuzzy sweatpants lining would look like a pompom hat top.  I added adornments, then hot glued the hat to the head.

sam_1269-1-e1552442494617.jpg
I enlarged this photo too much, sorry for the fuzziness!

Complete the Snowman by adding the button eyes (sew or glue), adding a small curve of felt for the mouth, and tie on strips of fabric (I used flannel) for a scarf.  I also wrapped a long bit of knitting I made, as a color accent and extra decoration, and tacked that down with a button.  For the nose, wrap a short length of pipe cleaner around the tip of a sharpened pencil, then glue it onto the face.

SAMSUNG CAMERA PICTURES

Your Snowman is done.  An extra bit – I glued bits of wool roving and a small jingle bell into acorn tops, a lovely accent.

SAMSUNG CAMERA PICTURES

To complete your Gnome, once the base is settled, the body is stuffed and the head is sewn shut, adorn your hat and glue it to the body.  The hats have some natural contour, but you can stuff them to encourage them to stand up more or curve in a preferred way. Before you add the nose and beard, you can add trim around the had and body, just glue it secure.

SAMSUNG CAMERA PICTURES

Make the nose by cutting the 2″ square of fabric into a circle, then baste around the circle, leaving the thread ends long enough to pull.  Pull the thread ends enough to cause the circle to curve and pucker.  Now stuff a dense wad of batting/fiberfill into the nose, and pull the thread ends to tightly close up the fabric edges around the filler. Securely knot the thread so the nose stays ‘closed’ and then sew the nose onto the Gnome body so it looks like it is peeking out from beneath the hat.

SAMSUNG CAMERA PICTURES
basted nose fabric, pull the thread so it closes around a wad of fiberfill to stuff the nose.

For the beard, simply wrap your yarn or twine around your fingers several times, so you have as abundant of a beard as you like.  Tie it with a secure knot at the top, then cut at the bottom.

SAMSUNG CAMERA PICTURES

SAMSUNG CAMERA PICTURES


Glue the beard to just under the nose, and possibly make a light row of glue across the belly to help the beard lay evenly across.  You can fluff up, braid or tuck in adornments to the beard.  Trim the bottom to your taste.

SAMSUNG CAMERA PICTURES


SAMSUNG CAMERA PICTURES


SAMSUNG CAMERA PICTURES


SAMSUNG CAMERA PICTURES
Your Home Gnomes for show are done!

Interlude – Sifting What Incubates

SAMSUNG CAMERA PICTURES

I am no longer ashamed to admit, that I expose myself to a lot of odd things on Youtube.  Mind you, I’m not out there looking for truth.  I’m mostly looking for cute animal things, crafts, exercise and beauty miracles (that I don’t do and probably don’t work), various white noise sounds to help me sleep, and, most importantly, following the bizarre things that show up in my video feed.  It fascinates me to no end to see how other people invest their time and attention, and how they are willing to see reality* from new perspectives.  And how they make their cases for supporting their views.

Remember, I said I’m not looking for truth.  But have you seen, did you know, that Paul is dead, and it’s Faul who took his place?  That the Earth is really flat (old news never dies, screw you ancient Greek scientists! And probably ancient Indian and Persian scientists too, who never get credit for much of anything!) (Seriously, the variety of proofs people offer on this topic is stunning.)  Or did you know how video evidence of fairies is really out there?  (They seem kind of mean, when they’re being videoed.)  Or, Holy Cow!, have you seen how ancient giants were turned into mountains and stone, the evidence on that is amazing! And then there’s aliens, secret space programs, weird weather,  super cool fringe science, Sphinx mysteries, all the classic and the newer political theories (q-anon is awesome!), and alllllllll the things to discover on alllllllll the horrible ways people treat each other (I’m not trying to be glib on this point, it’s just too devastating to try and list them.)

Like I said, I’m not looking for truth, but I’m not ruling out some of these arguments as being true either.  I am reveling in the endless ways there are to see and interpret our world.  And I am channelling that joy into being creative, and to seeing how much more of my kind of world I can create.

For the past three months, Pffftttttt….I’ve been a slug, creatively speaking.  Creating sluggery.  I dutifully finished another quilt (photos above), painted a few Christmas decorations and got through the holidays.  But there was nothing juicy and new going on.  I’m fine with that, because I was imagining having a Crafter’s Open House, and watching a lot of videos and cruising a lot of blogs to find inspiration on what the projects would be, and on how I could use my existing materials.  I sifted ideas.  I incubated potentials.  I unpacked a lot of totes and kept being surprised by all the materials I have on-hand.

My Crafter’s Open House happened this past Sunday.  From 2pm to 7pm, I was in my home and any of my invitees were welcome to show up at any point during that time and make something.  My project options were to make a stuffed snowman or gnome, make a multi-media collage or to make a paper lantern.  Instructions for each of these will eventually arise here.  The Open House attendees (thank you Zerik, Danielle, Marion and Emilie!) opted to make gnomes.

They came out charming, earthy, and even piratey!  And well moustached.  We had a good time exploiting our basic sewing skills and the hot glue guns, and the gnomes sparkle with as much unique personality as their creators.  I had intended to have a drawing for door prizes, but forgot, so those will roll into the next Open House.

Ok, I just invested about 20 minutes watching Youtube videos of real live gnomes caught on camera, thinking I would post one here.  But, I just can’t do that to you.  You would be much better off just looking for gnomes in your own home.  I’m sure they’re there. (FYI – a lot of these video sightings seem to happen in small rooms occupied by children in Mexico.  Go figure.)

Soon to creep out of a corner near you…… Folk Gnomes (and Snowmen) for Home and Show.

*did you know we are living in a simulated reality?  Evidence for glitches in the matrix is everywhere.  Look in mirrors.

The Journey of Memory Sun Catcher

Supplies:

  • Thick craft-foam sheet,  about 9″ X 12″, one-quarter inch thick
  • Clear hard plastic sheet
  • Sharpie Markers (or markers that work well on plastic sheet)
  • Double-Stick Tape
  • Rotary Cutter (prefered) or sharp scissors


The construction of this project is relatively easy.  It is deciding what your layers will show that will take the most attention.  I chose to stick with primary colors and simple shapes so the layering of color would create more depth.  And my drawn “memory story” I kept simple and symbolic of how I feel about the natural distancing of memories.

I found a pack of ink jet printable film, by Grafix, of four 5.5″ X8.5″ sheets.  I cut two of the sheets in half, which made a nice manageable size for drawing as well as being suspended in the basic foam framework.  Next I cut 1/2 inch wide strips from the foam sheet (the width of my double-stick tape).  I used a rotary cutter and clear quilting ruler as my straight-edge, along with my quilting cutting mat, and it worked well in making nice even edges.

SAMSUNG CAMERA PICTURES

Using one or two colors per sheet, I laid down my shapes and made sure they would overlap when all sheets were aligned.  A note – The marker smears easily and takes a few minutes to dry.  When I would overlay my 2nd, 3rd or 4th sheet onto the previous, I accidentally got color splotches where I didn’t want any.  And the Sharpie color does not come off easily or entirely, so be aware as you marker the layers.

SAMSUNG CAMERA PICTURES

With all layers dry, I went back and added my drawn elements to each sheet.  I used black marker for this, and it also requires a bit of drying time. Here is the first layer:

SAMSUNG CAMERA PICTURES

It is a little hard to see in the above photo, but I laid down the top and bottom lengths of tape along the back side of the plastic sheet, with the tape only halfway on the plastic.  Then I aligned the foam strip (same width as the plastic) along the tape, so half of the strip of tape sticks to the foam, half to the plastic.  For the left and right sides, cut your foam strip so it fits between the top and bottom strips.  Lay your tape perfectly centered on the foam then stick it to the plastic, inside and along the edge of the plastic.  The sides will be covering slightly more of the plastic than the top and bottom. This completes the frame on the backside of the Sun Catcher, so flip the piece over to its correct side.

When you apply the next round of foam framing, cut the side strips to go from corner to corner (the height of the plastic), and the top and bottom strips to fit in-between.  For each layer of foam framing, alternate like this so the corners have a “log cabin” patterning; this will stabilize the corners.  Your top and bottom pieces will always have the tape halfway between the foam and the plastic, and the sides will have the tape entirely on the foam strip.

Lay your second layer of foam frame onto the right/front side of your first plastic layer.  Now that first plastic layer has foam around its front and back sides.  Repeat the taping process that you did for the first plastic layer, placing half the tape strip along the top and bottom of the back side.  Then place tape wholly along the sides.  Flip the second plastic layer over, center it (the sides should align with the sides of the foam frame, and press it down onto the foam.

SAMSUNG CAMERA PICTURES

SAMSUNG CAMERA PICTURES

Keep building your layers of foam framing and plastic, until your four layers of plastic and six layers of foam framing are complete.

SAMSUNG CAMERA PICTURES

SAMSUNG CAMERA PICTURES

SAMSUNG CAMERA PICTURES

SAMSUNG CAMERA PICTURES

For hanging, I pushed a sewing pin into each side and tied black sewing floss onto the pins.

SAMSUNG CAMERA PICTURES

My camera does not capture that the depth of images shows up clearly and beautifully, and the overlay of colors creates more layers.  This is an incredibly lightweight project, which only adds to the idea of how insubstantial our memories can be.  For me, memories are like birds in the hand, once held close and totally sensual, but before you know it, they’ve taken flight, and you can only follow along until they are out of sight.


A Month in Summary

It’s already been a month since my last post.  I have been on a bender of quilting, having found a zeal for finishing several pieced quilt tops that have been in storage for some years now.  If the impulse is there, I like to ride the wave until it’s played out.  Here are the quilts I finished:

SAMSUNG CAMERA PICTURES

This twin-size quilt has a nice 1970’s era color scheme.  I originally did this pattern because I liked how straight lines could create a circular motif.  I did a lot of accent quilting in the solid brown areas, and used a different thread color for each column, so over the width of the quilt there is a subtle gradation of color, that doesn’t take away from appreciating the pattern.

SAMSUNG CAMERA PICTURES

SAMSUNG CAMERA PICTURES

I’ve had this queen-size peacock themed quilt for awhile.  Originally this was to be the backside of another peacock themed quilt I did.  The other quilt I did was all in neutrals, and this side is jewel-toned.  The piecing pattern is the same for both.  I never figured out how to work my thread colors for each side, so I decided to make separate quilts.  For some of the center panel I went to a local quilt shop to play on their longer machine, but most of the quilt was done on my machine at home (I LOVE my Bernina!)  The quilt is so expansive, I have no good way of displaying it to photograph.SAMSUNG CAMERA PICTURES

The back is a burgundy color, so I played with thread colors and you can see all the feathers I sewed.

SAMSUNG CAMERA PICTURES

SAMSUNG CAMERA PICTURES

SAMSUNG CAMERA PICTURES

SAMSUNG CAMERA PICTURES

There is one more quilt top to complete, but I’m taking a break.  I FINALLY created my Sun Catcher project that I mentioned in my Distilling the Moment post.

SAMSUNG CAMERA PICTURES

I designed this project with consideration of how our brains access memories.  Each time we remember, we are further away from the actual time/space experience that we had.  Each memory is a distillation of a core event.  So I was thinking about how our awareness is what illuminates our recollection, and there are many layers we access with every recollection.  The layers may seem transparent, our memories may seem like they are true to the actual experience, but the layers lead away from us and our current point in time/space.  We look back into memory, often as a consideration of how much our current moments have moved us away from what was. So, fast approaching, are instructions for The Journey of Memory Sun Catcher…..they’ll be here and gone before you know it!

Distilling the Moment

woman in white cap sleeved shirt blowing dust
Photo by Jakob on Pexels.com

I’ve been in an interesting and suspended era of contrast: the final push of dissolution of any old remaining structures of separation in my being, and the seemingly inert pulse of pure presence in my living.  The more things empty out of me, the more I fill with Me.  So it’s hard to talk in terms of action-oriented creativity, because everything that’s been going on has been so sublime and not easily related through language.

I’ve continued to consider layers of depth from my last post, Symbolic Thinking, and I’ve imagined a sun-catcher project that I’ll start as soon as I finish the latest quilt I’m working on (I’m almost ready to do the binding, so only a few days more.)  Years ago, I read about how our brain works when we remember things.  Here’s an article about the science. When we remember something, our brain only follows the pathway back to the last time we remembered it.  So our experiences, our memories, are not fixed points in our brains that we reach into with each remembrance, but are more like free-floating and evolving experiences that tweak every time we go back to them, and depend on what we have to filter them from our current point of view. The sun catcher project involves layers of memory and points of illumination.

A recent experience I had, that was such a high when I was in it, but has already emptied of very much meaning, involves turtles.  I meant to create a blog post about it when I got home that day, but forgot.  And then as days passed, I kept forgetting.  Now that I’m here,  and focused on posting, my memories of what felt so alive about this are faded.  But I’ll still include it because I remember it was an exciting experience, and I have photos!

I was at a park I like and crossed paths with a little boy and his mom.  They had a small plastic container and were looking for frogs and baby turtles.  It seemed like an exciting project to me, and they came well-prepared.  I searched the creek with them for a few minutes, hoping to find a frog, but doubting about the turtles because it’s late in the summer for that (or so I thought.)  I wished them well and continued my walk.  About 15 minutes later I crossed paths with them again and the boy had found 3 baby snapping turtles!  He said they were crossing the parking lot, fresh-hatched and bee-lining for the pond a far distance away.  I asked to hold one, and the boy let me hold one for about a minute, then he took it back.

I was so amazed!  And a little jealous, because he had found exactly what he was looking for.  And a little resentful, because I didn’t get to hold the turtle very long.  And a little concerned, because these turtles are meant to be wild and how qualified was he to care for them?  And a little jaded, because I had doubted in his quest all along.  So after asking what he was going to do with them (keep them for a night and bring them back tomorrow) and what he was going to feed them (mealworms) I wished him and especially the turtles good luck and continued on to my car to leave.

And that’s where I saw them.  Four of them.  Fresh-hatched baby snapping turtles crossing the parking lot towards the pond.  And feeling a lot super-blessed and elevated and transformed and returned-to-innocence, I scooped up those four and we went to the pond and spent time together.  As much time as I wanted, (and with great consideration that the turtles probably wanted to get into the water and eat something.)  I spent about 30 minutes herding and guarding and enjoying the turtles.  Four teenage boys rode up, they had crossed paths with the little boy too, and were in search of turtles.  So I invited them over and we all sat on the stones by the edge of the pond and held turtles and eventually watched them scoot into the water to finally start some unharassed living.

IMG_20180910_170105

IMG_20180910_170121

IMG_20180910_170249

IMG_20180910_170318

It’s good I took photos.  They help me get back into those moments.  It already feels like a lifetime ago.  But it was last week.  What will this week bring?


Symbolic Thinking

I love symbolic thinking for the way it opens the depths of any given experience.  The smallest of things can become epic journeys of discovery and revelation if you’re able to dive into the symbolic aspects of it.  Yet also, I get very aggravated with symbolic thinking because it can quickly overcomplicate and distract from an experience.  It can easily knock one out of a Now moment and cloud the heart of what a moment has to offer.

IMG_20180831_112931

IMG_20180831_112921

My example:  Last night around dusk I went to a favorite spot along the Fox River and as I enjoyed sitting along the rock edge, I noticed a monarch butterfly floating on the surface of the water.  I decided I wanted its corpse to do something with, as I have with others in the past.  So I got a stick and lifted the little guy out of the water.  But he wasn’t dead!  He clung instantly to the stick, and so I rested it on the rocks beside me.  We sat there together as he dried off and I wondered if he could fly again.

IMG_20180830_192549

When I was ready to go home, he was still there and clinging heartily so he (on the branch) came home with me.  The night was cool, I knew between the temperature and wetness, his movements were limited so I nestled the stick with him on it into my flowers on my patio.  He was hidden for the night.  That’s when my thoughts started to dissect things.  I’ve been in a long era of transformation, one that has been especially exhausting this summer.  Butterflies are a symbol of transformation, specifically the end result of its stages.  I was excited to find this whole butterfly (realized catharsis) buoyed by the depths of emotion and the feminine (the river waters).  But as the butterfly was alive, my doubts set in: I wanted his corpse, not intending to ‘save’ him, so was he now my responsibility?  Did he know the end was near and so made the choice for a quick and easy death (by drowning) and did I steal that away from him?  Was I being cruel in having him live only to starve and never fly again?  Was he there as a symbol for the end of my own transformative process, and was I to just bear witness to whatever that process was, without reaction or responsibility?  Should I put him in the freezer and end it quickly?  Should I keep him through his death, because his body was meant to be with me?  There were many other smaller details of thought, but you get the idea.

IMG_20180831_094856

He was still there this morning, and willingly rested on my hand and fingers for a long while.  As part of my inner debate I decided if he ate, it would let me know if he was trying to live or not, so I placed sugar water on my fingers so see if he would eat.  He didn’t, so I decided to return him to the park, and placed him on flowers that other butterflies were on.  I watched closely and he didn’t eat there either.  I eventually got him back on my hand and we sat on a bench and wondered at things.  Should I leave him there so nature could re-embrace him?  Since this whole thing started out with me wanting a dead butterfly, should I wait it out till the bitter end, to get that corpse?  What does that say about me and how I approach life?  How do I feel about myself, when I ‘save’ something, only to abandon it later?  Why would I assume the butterfly was suffering, whether because I thwarted its annihilation plans or simply because it couldn’t eat or fly anymore?  Is it self-aware enough for that?  When I held it up and looked in its eye, who was looking back at me, what were those eyes saying?

IMG_20180831_112709

As we sat together, it tried flying a few times and failed.  He let me pick him up each time.  At one point, his head actually pivoted, then his body aligned with it, in the direction of a flowering plant I had been thinking of setting him in and leaving him there.  So I used that as a sign, his change of direction towards one of the places my thoughts were in, and I set him in the plant and left.  Maybe a bird will get him, maybe he will fall peacefully from the plant into the fen and once more be nourishment in a cycle.  Did I gain anything from this experience?  I thought I was getting something interesting to incorporate into an art piece, but I got something interesting to inspire an art piece instead.  If this is what launches me back into feeling creative, it will become the next project I share.

In the meantime, I have been practical and have finished two more quilts that had been pieced any laying around for awhile.  I’m pleased with the results.

SAMSUNG CAMERA PICTURES

This one is smaller and is made with a set of 2.5 inch Liberty of London fabric squares, supplemented with old vintage neutrals I had and my favorite color, orchid.  I designed the pattern myself, and am pleased with the outcome.

sam_0922.jpg

Here I pulled together panels of children’s literature favorites: Dr. Seuss, Curious George, Eric Carle, Goodnight Moon and Snoopy. I used dozens of free-motion patterns in this one, and it made for excellent practice.

Project Updates

Since we still have a week of Mercury Retrograde, and have just emerged from a rough eclipse season, I thought I would back-up a bit and provide updates on past blog projects.

The scrap quilt I mentioned in Full Throttle Inertia is finished.  I had no presumptions about what it should be, and enjoyed watching it become what it is.  I especially enjoyed the quilting pattern I designed for the white space, based on a beaded curtain.  I also drew bird silhouettes and the middle section has quilted birds flying around it.  For the scrap squares I just stitched in the ditch around each square and color strip.

SAMSUNG CAMERA PICTURES SAMSUNG CAMERA PICTURES

SAMSUNG CAMERA PICTURES

The clear plastic orbs I created in Interlude – The Traveling Eye, part 1 have been surprising.  They keep exploding!  I have them strung and hanging where an air vent blows on them, and one night I heard a funny sound (I was asleep.) In the light of morning I discovered the one that had moss in the middle had popped open, and peppered everything below it with moss bits.  The empty orb blew out a week later, also in the middle of the night.  I repaired both with clear packaging tape, hoping the added width and strength would be the solution.  But no.  Weeks later, POP  POP, and there they went again.  I repaired them again, and now they sit a far distance from the vents, and are holding their own.


Early on, in Making Use of the Negative Space, part 2 I decided to try creating a living painting, and so I got a canvas and each day for a month I painted for 10-20 minutes, on that canvas, creating ever evolving scenes.  It had been awhile since I had painted in that way so I set a few parameters.  Using acrylic paints, I started with an ocean and sky motif, mostly allowing for making an emotional representation.  A slight story started to emerge, about a being in a boat.  So my painting of scenes over time and on the same space of the canvas took on an animation aspect, of progressive images building a story.  Each painting session I would take 4 or 5 photos as I painted and then I made a slideshow of it.  The slideshow flowed poorly; I’m sure our library has design software I can use to create smoother transitions.  When I get that figured out, I will post the video.

Some unexpected fun from this project is that I often held the canvas in my left hand as I painted (I don’t have an easel.)  During the turbulent ocean scenes I tended to use stabbing, rough brush movements, and it was a hard bristled brush.  My canvas became a drum!  My act of painting created its own soundtrack, and the sounds I could make began to guide what ad how I painted.  It was exciting!  Below are a few of the stages the painting has gone through.

My external life has made demands on me this summer, so my inner life has been nesting and resting.  I hope to return to some productive creativity and thoughtful commentary soon.


Full Throttle Inertia

How creative can I be from a place of total inertia?  The mystics say the Still Point is the only place from which real creativity can come.  I tend to agree, but sometimes being in that Still Point is so damn boring, and you just want a little project to pass the time.

A few months ago, I aggravated a right foot issue that kept me hobbling for a month.  A few weeks ago, some mystery balancing act of pain acted up in my left foot (alas, Daniel Day Lewis is nowhere to be seen) and I have been as off my foot as possible.  So I have been languishing in a dull rotation of ennui, vapidity and miseration.  The excessive heat and OTC pain pills have kept my mind dull, my spirits flat, and my body rather intolerant.  What’s a Creator to do?  Youtube.

I’ve found watching videos about acrylic pour methods to be soothing, and found this one.  I like how this young man sets up conditions, adds paint, and sees what comes of it. Forces of nature take over and expressions of pattern ensue.  It is interesting to see when he chooses to specifically interfere with the process and when he lets it be.  The role of the artist here seems more passive than is usual yet it is also more symbiotic in how method and materials have their own voice and are less controlled by the artist.

Back to me.  I haven’t felt innovative or artistic, but I have managed practical functionality.  I decided to whip up a small quilt 60″ X 72″ out of my scrap bag fabrics.  Going through my stash to pick fresh fabrics, for a fresh design seemed like too much, and my scrap bag was overflowing. So I managed to sew several strip sets, cut some squares and set it all into a nice clean white background.  I didn’t feel like I needed those fabrics to live up to anything because I’ve already used them beautifully elsewhere.  It was a nice, low pressure project.  Here’s the gist, as I haven’t quilted it yet:

sam_0903.jpg

SAMSUNG CAMERA PICTURES

SAMSUNG CAMERA PICTURES
I have draped the backing fabric over this one

For being in a totally mediocre head space, I have to say, this quilt managed to be a fine little thing.  It may not be a leading edge of design,  or born from a place of inspired vision, but it is a humble, comfortable, “Yes!” It will be a nice gift for someone someday, much as its quiet creation has been a gift for me.  Creating this quilt got me back on my feet again, in so many ways.

2 + 2 = 5, yes it can!

I’m feeling profoundly exhausted at the moment, and rather than exert energy in getting out of my recliner and going to bed, I’m letting completely random things pop into my mind.  One of those things was ” 2 + 2 = 5.”  And in only a few minutes of sketching out imaginary sticks, I saw how it could be demonstrated to be an accurate equation. Here you go:

SAMSUNG CAMERA PICTURES

I googled the equation and see there are people out there who offer mathematical proofs for this.  They do it with a tricky flair, so use that grain of salt.  (for example, a commenter on a youtube video suggested starting with 4x = 5x, then remove x, 4 = 5 and therefore 2+2 = 5.  No one else commented that that method removes the equalizing force of x, but we’re not talking absolutes here.  Only proofs manipulated to support a proposal.) But it has me contemplating math and symbol.  The equation is made up of glyphs that are representational.  They represent given quantities, and then they exert an action on those quantities, as well as show a relationship between those quantities.  It is all ephemeral, even if we base realities and truths on those glyphs.  And, there is an underlying assumption that the quantities represented are equal. One “1” is equal to another “1”, and when considered collectively, they can be shown as “2”.

My little demonstration with lines, while also representational, goes more into the actual form of something quantifiable, in this case lines.  But those individual lines are not equal.  Two of the lines are vertical, of the same length, but each occupies a different space.  The other two lines are horizontal, not of the same length, nor occupy the same space.  The degree of detail or description I use to define my basic line or “1” line, decides  how much I can represent those lines as quantities in an equation.  If my upper horizontal line is twice the length of my other three single lines, then I could write the equation (1 length + 1 length) vertical + 1 length + (1 length+ 1 length) horizontal =5 lines, would be right, and would be a dimension of truth in the equation 2 vertical + 2 horizontal = 5 lines. But it only has an element of truth because I have neglected to define my quantities equally.

I have also shown how 2 (lines) + 2 (lines) = 5 (90 degree angles.) Now my details are way off, but it still demonstrates the equation.  (2 things + 2 things= 5 things) So, what’s my point?  At this late hour, I’m not sure if I have one.  I really just got to thinking, and decided to write it all out.

But I offer the invitation to consider how things you think are truthful or absolute (like 2+2=4) or things you think are false or ridiculous (like 2+2=5), can be completely altered when taken from concept into form.  How are you allowing your world to create itself around you?  How many beliefs limit what your reality can show you?  And how much proof do you need to allow your experiences to be as true as your beliefs, especially when they contradict each other? Sweet dreams.

dreaming of math