Supplies:
- styrofoam
- floral wire
- polymer clay
- acrylic paints
- ModPodge, matte or gloss finish
- thick sheet of wool felt
- wool roving
- needle-felting needle
- feathers
- hot glue gun and glue sticks
Yes, that’s right. We’re doing a dodo. I have a “Natural History” display cabinet, and it has been needing a dodo. I had been imagining simply sculpting one from the polymer clay, but I had concerns that it might be top heavy and keep tipping over. I happened to see the video in my previous post , and happened to have a bag of feathers and a styrofoam disk, so I decided to create an armature and build my dodo as a taxidermy project.
The styrofoam disk is from the dollar store, and I cut it into thirds. Then I paired two of the wedges, honed their shape a little more and created a couple of staples from the wire to hold it together. Then I rolled the sharp edges on the table to round them out. This became the body base of my bird.


The next to come was the base for the feet and beak. I formed the wire into basic dodo foot shapes, and made sure I had prongs leading from the top of the feet so I could press them into the body base later. Then I shaped a base for the face and beak, also including attachment prongs. This was a great way to use an obnoxious orange clay I had from another project. I overlaid the clay and detailed it to make a flashy pair of feet and a beak. After baking the clay, I painted and clear-sealed it.


Now comes the taxidermy (in a very faux sense of the word). I accidentally deleted a few of these photos, so I can’t show you the process of adding a styrofoam neck base to the body, or of cutting sections of the wool felt sheet, then hot gluing them onto the foam base. Unlike real taxidermy, I wasn’t concerned with mounting an entire pelt around the body base, so I was free to cut and align smaller sections of the felt. Also, in deciding the arch and shape of the neck, I kept holding up the face piece to get an angle that I liked. When applying the felt, I was careful to press it up against the face piece so I wouldn’t have to needle-felt any patches in that area later.


My photos for the finishing steps were also lost. So please employ your imagination for this part.
I felted roving around the bird, to add color, smooth out my base felt patches as well as to fatten the body up. I had to stab gently with the needle, and often at a severe angle because I couldn’t stab into the styrofoam base (it was too hard) and I did not want to break my needle. So I was careful to only poke into the felt base (and that is why it helps to have a thicker sheet of felt to begin with – the one I used is carried at both Hobby Lobby and Michael’s.)
I experimented with a lot of things to make the wings. I was out of polymer clay so I shaped thinner slivers of the styrofoam that I had left onto a wire, heavily painted them, and was easily able to poke a few layers of feathers into the foam. I used an awl to make a guide hole through the felt layer of the body, then pressed the wings onto the body. A few feathers became a tuft of tail, and my little display dodo was complete!
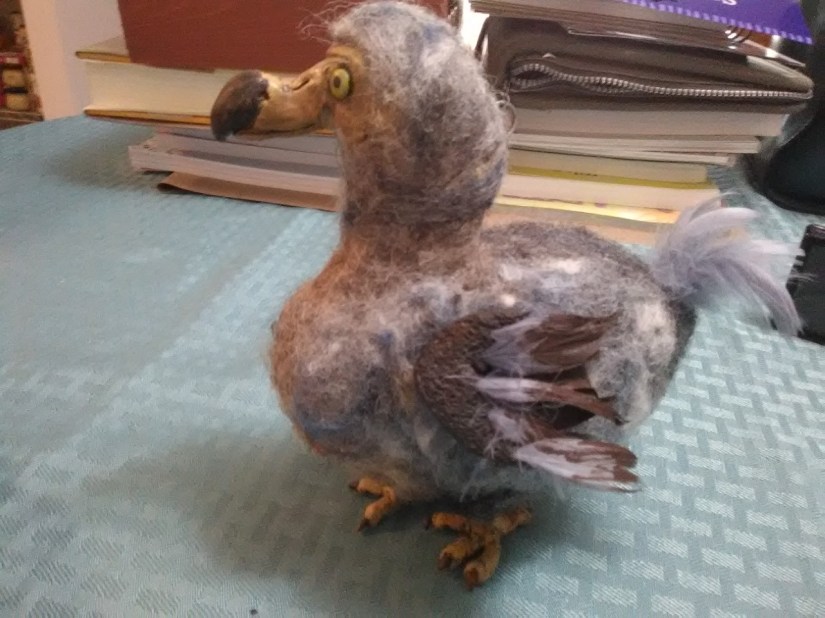
My dodo is now a cherished part of my Natural History cabinet, as well as a reminder to cherish and support the well-being of the many bird people who currently fill my life.

He’s really amazing, Dawn! Love his feathers. Thanks for sharing. Fran
LikeLike